Pop-up Christmas Card
- Posted / updated on
- By Kathrin
- Posted in Cardmaking, Christmas, Freebie
- 0

Hier geht's zum ARTIKEL AUF DEUTSCH
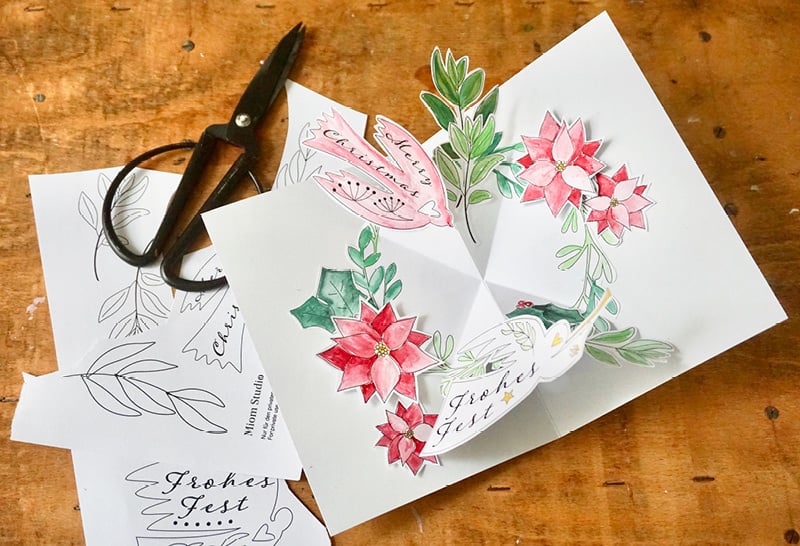
With my free templates, you can easily make this charming, three-dimensional Christmas card yourself! This DIY pop-up card is a very special greeting for family and friends – unique, original, and full of Christmas magic.
The templates are available in German and English.
In my Instagram Reel and YouTube Short you can watch me makig a card.
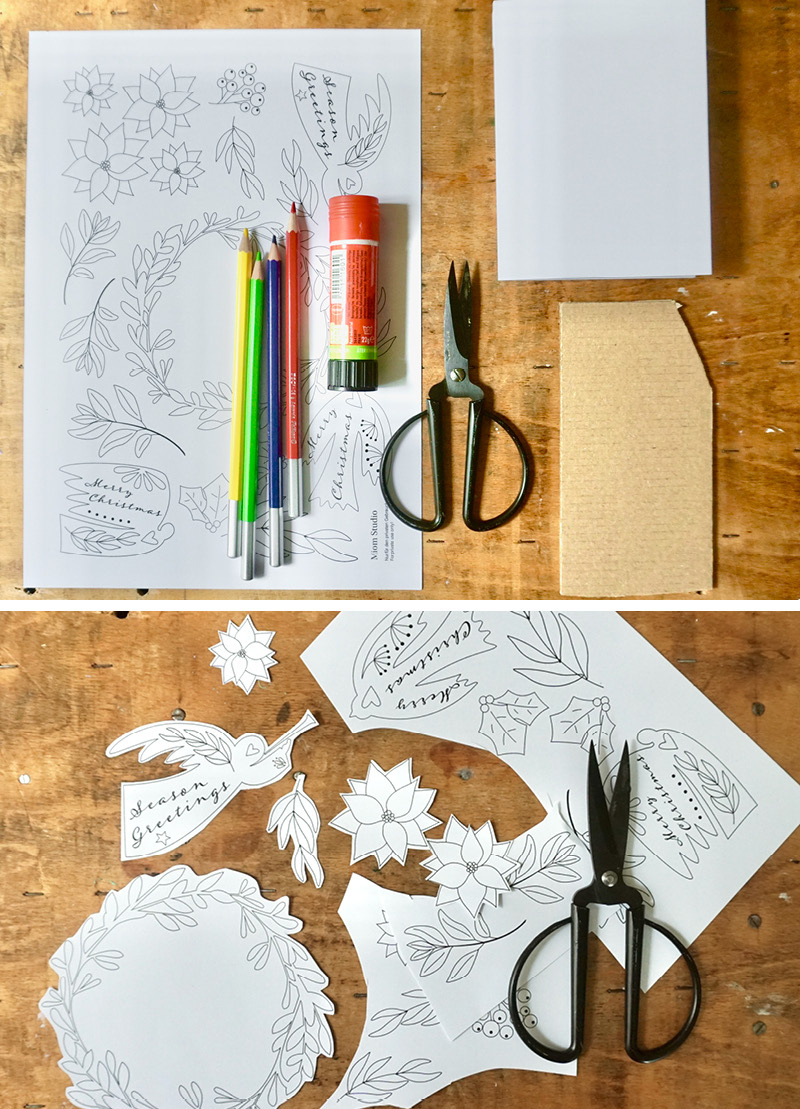
You'll need:
Printed template (see below)
Blank card
Scissors
Glue
Colored pencils or watercolors
A piece of thick (shipping) cardboard (optional)
Free printable
You can download the free template here (PDF, German + English).
For personal use only!
It's best to print the template on paper that's slightly heavier than copier paper.
The card works best if your card and the paper you're printing on are the same color.
Instructions
1 Print out the template and gather your materials.
2 Cut out the shapes from the template as coarsely or finely as you like and color them. Of course, you can also color the template first and then cut them out!
You probably won't need all of the illustrations for a single card. So only edit the shapes you plan to glue into your card later. Only the large wreath is absolutely necessary.

Coloring tip: Light shades visually push the flower forward, while dark shades push the flower back. Therefore, paint the front petals of the flowers light and the back petals darker. You can even add a touch of dark purple, dark blue, or dark green to the shadowy areas. This will give your flower a three-dimensional effect.
Fold the wreath
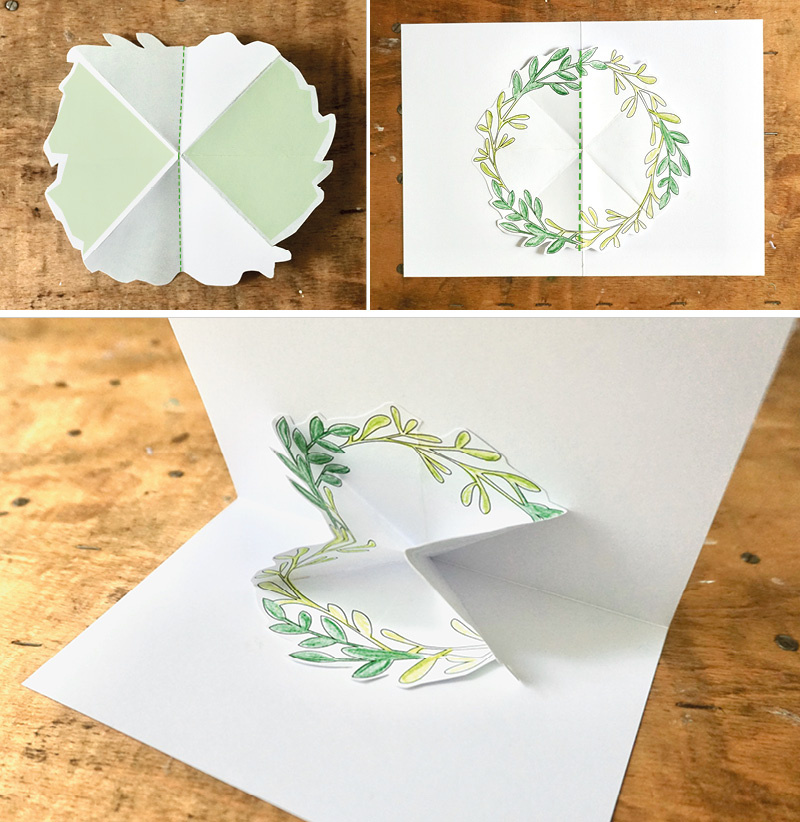
3 Fold your cut-out wreath in half. We'll use this fold – marked in green here – as a guide in the next steps.
4 Fold the halved wreath in half again.
5 Fold the top layer in half again.
6 Turn the folded wreath over and repeat step 5 on the back. Your wreath is now divided into 8 pieces.
7 Unfold everything again. Remember where your very first fold ("green line") is.
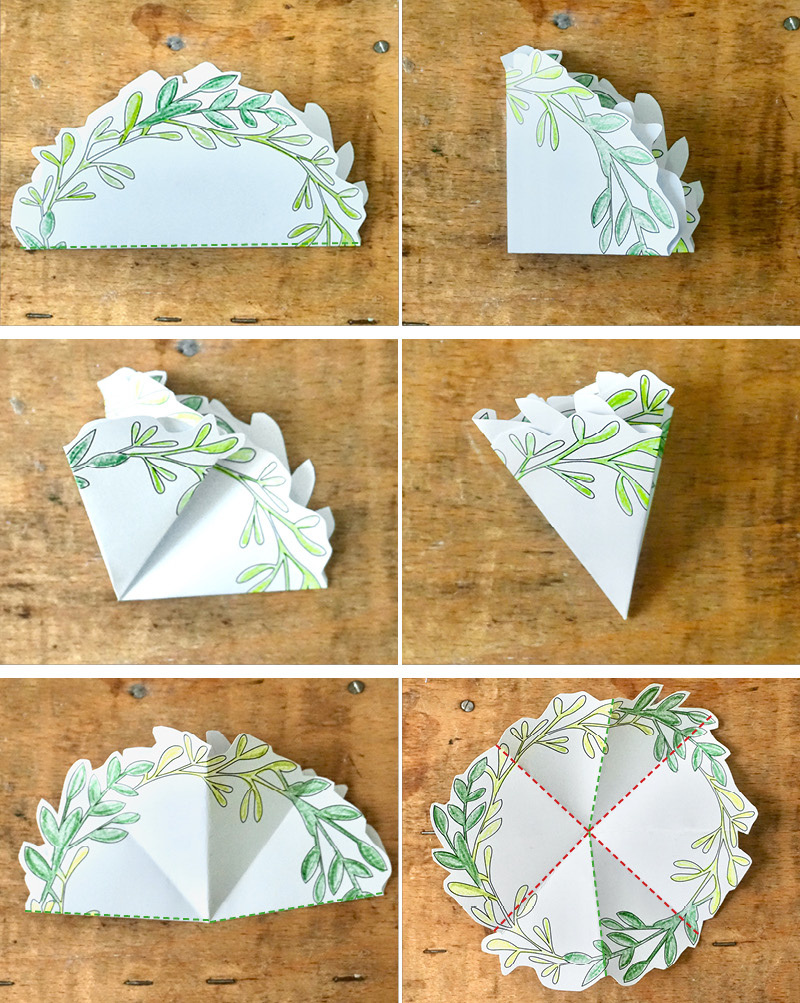
8 Place the wreath in front of you so that the "green line" is vertically in front of you.
9 Then fold the wreath diagonally to the bottom right (along the red markings). Press the edge firmly and unfold it again.
10 Then fold the wreath in the same way to the bottom left, press the crease firmly, and then unfold the paper again.
11 Now you can press the top and bottom points of your wreath (green line) inward toward the center of the circle. Fold the now quartered circle tightly.
The centerpiece of your pop-up card is finished.
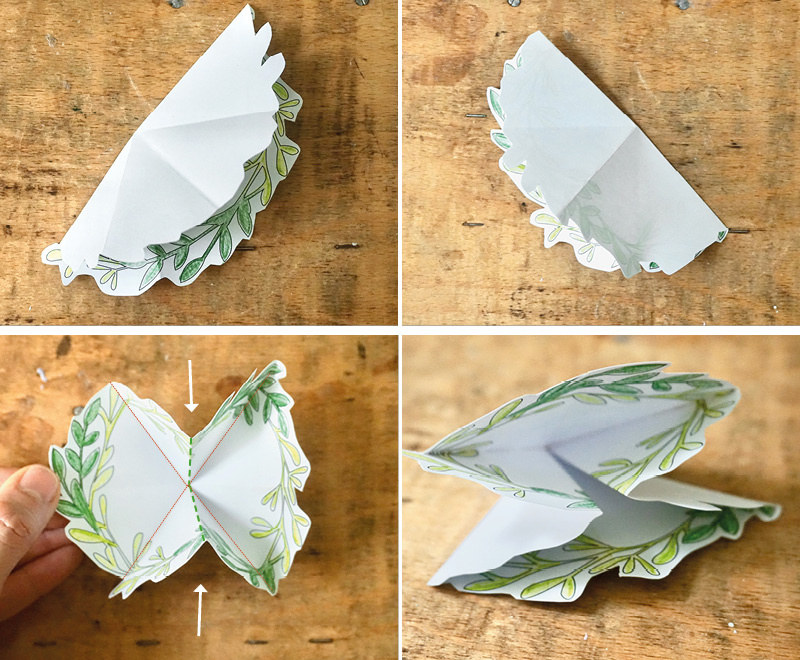
12 Now glue the wreath into the card. To do this, turn your wreath over. Apply glue to the left and right quarters of the back (areas marked in green).
13 Glue the wreath into the card so that the center line of the wreath (green line) is directly on the fold of the card.
If you now fold your card open and closed, you'll already have a 3D effect.
Decorate the card
I have two options for further decoration for you. You can use one or both, as you like. The first is easier to implement.
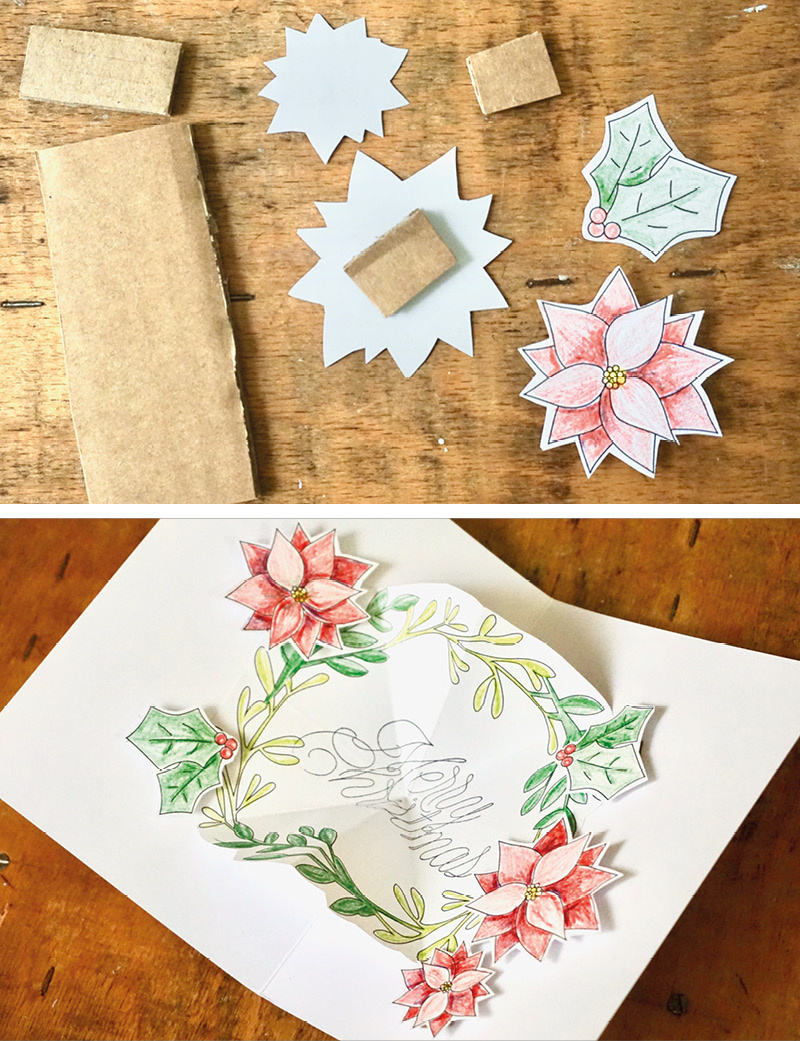
14 Glue the graphics you cut out and painted at the beginning into the card. If you first glue them onto a piece of thick cardboard and then glue them into the card with the cardboard, you can easily create a 3D effect.
Even with just this first step, you'll have a beautiful pop-up Christmas card.
(You can order the Merry-Christmas-stamp in my shop!)
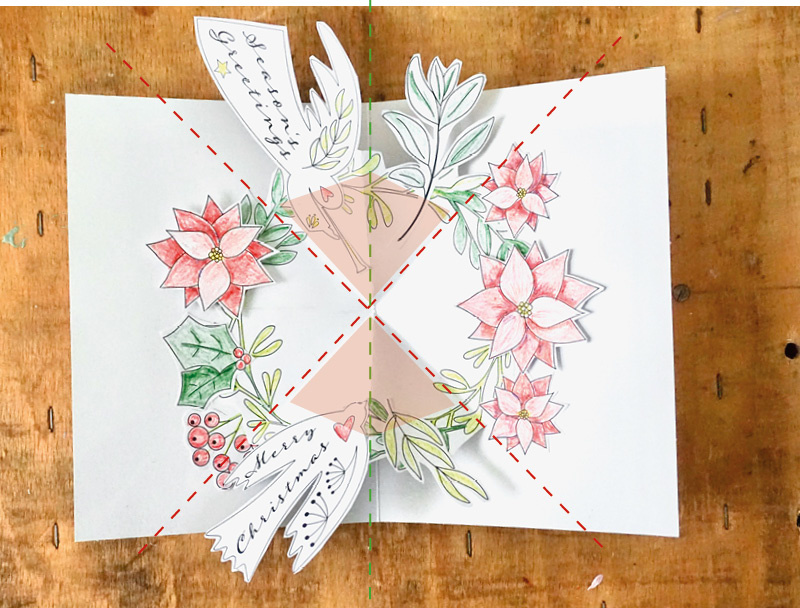
15 You'll achieve a more impressive pop-up effect if you (additionally) cover the top and bottom quarters of the wreath—the parts that "pop out" when you open the card—with cut out illustrations.
Here, I'll give you a few theoretical tips. However, the general rule is: experiment! Glue a graphic in place with a small dab of glue, close and open the card, move the graphic until everything fits, and then glue it in place.
Tips:
> A graphic may only be applied to either the left or right side of the areas marked in red in the image. Do not apply a graphic to both sides—then the pop-up effect will no longer work.
> Imagine an extension of the folds, as I've drawn them in the image. The glued-in graphics may extend beyond the green line, but not beyond the red line.
> Make sure the graphics do not protrude from the closed card.
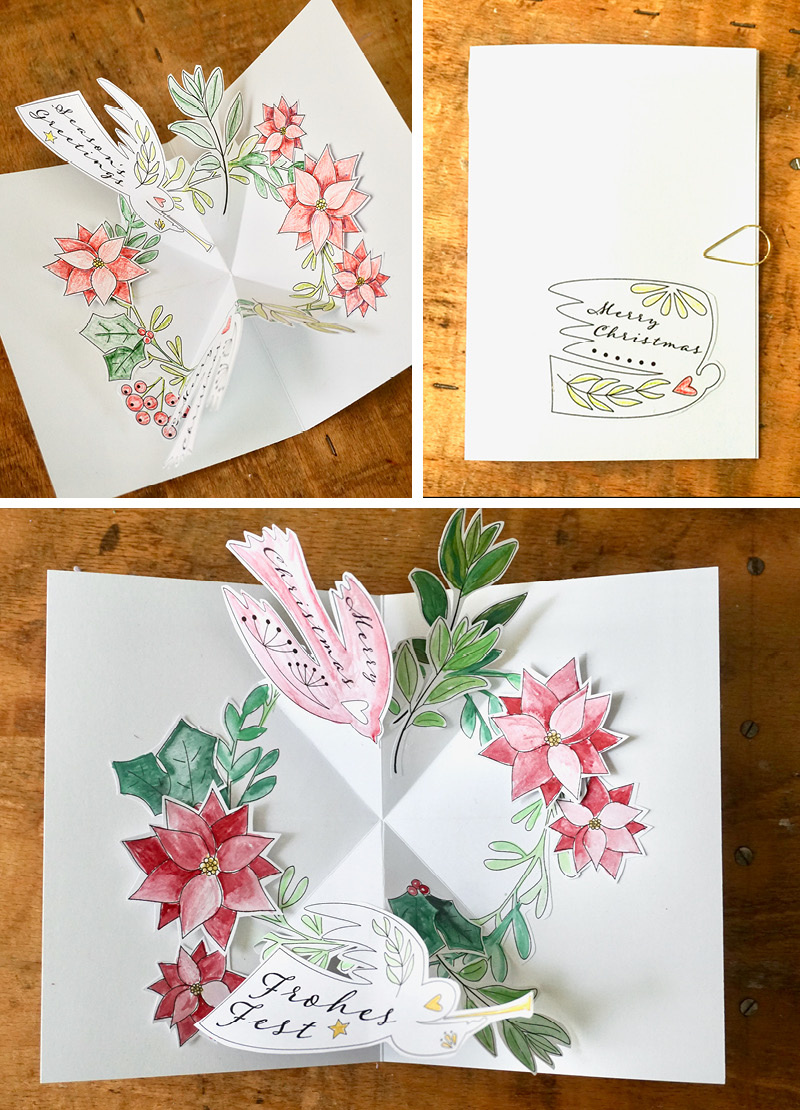
16 Decorate the front of the card. If you like, you can close it with a nice clip.
♥ Have you made your own pop-up card? Feel free to share pictures of it on Instagram and mention @miom_studio so I can see it and share your post! ♥
Feel free to follow me for more craft ideas:
Instagram Facebook Pinterest YouTube
Comments
Be the first to comment...